Saturday, February 25, 2012

From Blah and Boring to Bursting with Boldness... Living Room Reveal

I am going to give you a fair warning, right now.  This reveal is not for the faint hearted.  If you're way too afraid of change and color, stop reading NOW.  You may hurl from color overload.  If you are sick and tired of your boring construction grade beige walls, then follow along with me.  Also, if you were expecting this area of my home to mimic my Master Suite, then you're in for a surprise.  I no longer follow the rule of one home = one theme.  I want to love my home, but love all the rooms differently. 

Below is a reminder of how humdrum and lifeless my living room used to be.  It was so crammed and tight that I could almost hear it screaming to stretch its legs.  The couch was tiresome to look at, the ottoman had turned into a dumping ground for backpacks, remote controls, jackets, sweaters.. you name it - it ended up on that ottoman.  The entertainment center had also turned into an eyesore.  I am by no means a minimalist, but I hate hate hate clutter!

Note the old drum set chair is being used to hold Mr. Smitten's coffee cup.

So are you ready for it?  Brace yourself.  If you need a reminder or extra preparedness time, click here to see what color palette and decor I chose.  When I revealed to Mr. Smitten the color I chose for the accent wall, he looked at me like I had definitely been dropped on my head as a baby way too many times.  Guess what?!  It turns out I'm not as crazy as he thought!  


Taa-daaaaa!!!


How's that for stimulating the senses?!  I freakin love my living room!  With just a few changes and a small budget, you can wake up a room.  In my case, I didn't just gently shake my living room awake, I barged in with a marching band in tow.


Just another angle
Here's what I changed:

 Changed the accent wall color
Added an area rug
Gave the ottoman an overdue eviction notice
Added more eye candy
Finally found a storage solution
Cleaned up all that clutter


Do you love my ginormous Ikea light fixture?

I gave Mr. Smitten his very own table for his Friday Night Game Time necessities: Coffee, remotes, iPad, Xbox controller

Now he's ready to pull an all nighter for Halo Reach

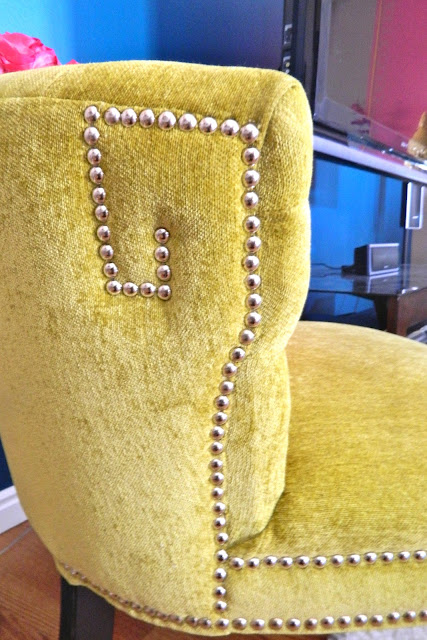
 I found a tufted side chair in the perfect shade of green at Marshalls.


My favorite aspect of the entire chair is this great nailhead trim design.


No, I didn't give in to Pier 1 and spend $100 on each ceramic stool.  I found these lovelies at Ross for $29.00 each.

I can't seem to get the lighting right, but these stools are navy blue with an amazing glaze job!
 When I'm determined to find a piece of furniture, I never throw in the towel until I can claim it as mine.  I stormed through over seven stores until I found this mirrored dresser at TJ Maxx in Riverdale.  This stores over 350 dvds, all of the hubby's video games and a couple gaming systems.  My sister, Winnie from Fam Och in the Yukon will show you how she taught me how to accomplish just that in a future post.

So purdy

Added a touch of Asian to the mix.
 I will always stress in every post that I am on a budget.  I cannot afford to splurge on a fantastic piece of art on a large scale.  Have you ever checked out the prices on those babies?!  Not my cup of tea.  What do I always do if I can't but it?  I make it myself!  Since there was already enough going on with my dresser vignette, I needed my art piece to be simple, but at the same time make a statement.  I also needed it to be fairly large.  Paint canvases can get pricey and Walmart couldn't accommodate me with a huge one, so I used a thin piece of plywood.  I am resourceful, if nothing else.

Easiest painting I ever created!


I used a couple of the same pieces of decor I already had up.  Love this giraffe and charger  so much and it was perfect for the color scheme!

If you haven't noticed, it's all about circular objects for this project.
One more look at my *Color Splashed* living room.


Did I do David Bromstad proud?

Are you ready for more???  I've started a new project today.  The picture below was my old office before I moved down to my Marie Antoinette Inspired Art Room/Office.  It has slowly accumulated junk and transformed into a storage unit.  I'm turning this room into a guest bedroom that my out of town visitors will love to sleep in.  And my inspiration?


This little blue box


~*Abigail*~

Monday, February 20, 2012

Channeling David Bromstad.... Living Room Sneak Peek


Is everyone having a fabulous Monday, so far?  I am!  I am this --- close to putting together all the finishing touches to my new and improved living room.  I am so excited to share it all with you because I am doing something a bit different - a bit bolder.  In this post, I'll give you a lot of hints with how it's all coming together.

A major giveaway is my all-time favorite HGTV show, Color Splash with host, David Bromstad.  There is not one episode of this show that hasn't inspired me in one way, shape or form.  He is a color mastermind!  I always hear myself thinking, "Oh, I wish I was that brave with color." or "He totally pulled that off, can I?" Well, I say - WHY NOT?

My idol, David Bromstad
via HGTV

Love his style!

via HGTV
So here are the colors that I'll be incorporating into the furniture, decor, and walls.  I am, however staying mum about how I'm using them.  Don't you just love how I shed light on a current project and then pull you right back into the dark?  Bwahahahaha...  I really am laughing out loud right now.  I'm sick in the head like that.

Like any other room, I'll be using different shades and textures of each color.


Did I hear you just say, "Oh no, she didn't"?  Oh yes... Yes, I did.  I'm using small doses of these two colors below.  It's going to be sooooo much fun.  


Onto furniture and decor...

I need some textiles, extra furniture, storage solutions and fun accents.

I need a new area rug

I loooove tufted chairs!
via Perlora

I want some sort of mirrored chunk of furniture.  Not this one - too pricey for something being sold at Downeast.

I've been toying around with the idea of adding some ceramic garden stools to the room, but having a hard time finding some that are affordable.  These stools from Pier1 are $100 a pop.  Yikes!

Last, but not least, I'd like to add a fab Buddha Head sculpture into the mix.  Just because I feel like it.


So, there you have it.  I gave away quite a bit of what I've been keeping under wraps.  The only person that I've sent progress pictures to is my sister, Winnie of Fam Och in the Yukon.  She's doing an awesome job of keeping her lips sealed.  Keep watch because next week I want to wow you with the transformation.  Here's another reminder of what is used to look like:

Ewww

~*Abigail*~

Monday, February 13, 2012

Jello Molds = A Work of Art

Happy Monday, everyone!!  I hope everyone had a fantastic start to the week.  Today is my birthday and I've decided to spend it working on a brand stinkin new project!  Yes, I have moved onto yet another makeover - BUT, before I let you in on it, let me share with you something that I just wrapped up today.

I am constantly searching the internet for some great deals or DIY projects and I came across these Gold Seed Wall Art pieces through Joss & Main.  I thought to myself:  That's a pretty good deal.  $49 for 10.  As I always do, I scrolled down to study the specs and found they were only 2"x2"x2" for each seed.  Uhhh, that's tiny and a huge ripoff for those like me, on a budget.  I scrapped the idea of purchasing them and decided that I loved them enough to make a DIY project out of the unfortunate situation.

Soooooooo pretty!  Soooooooo expensive!

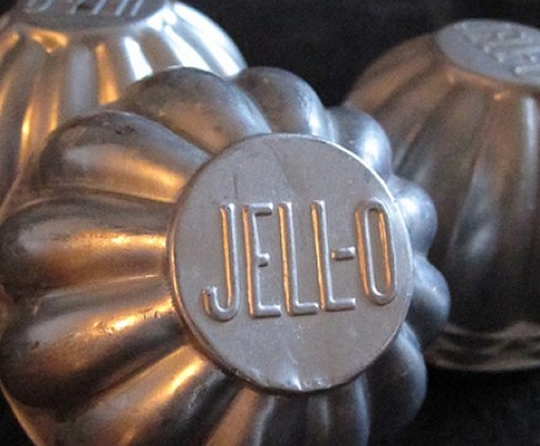
So where can I buy something that's similar in shape, bigger and extremely cheap?  Duhhh, the DI, of course!  I found 15 Jell-O molds for $1.00, ran to Walmart for some paint canvases (I didn't want to have 15 holes in my wall for each mold) and set them up on my counter top to make sure I marked exactly where I wanted them to be placed.


I painted the canvases

Buy the brush and paint at Home Depot.
 Chose metallic silver for these flat canvases.

Applied same metallic brown glaze on top of the silver.

I just rubbed on the glaze with a paper towel.

I wasn't too excited about spray painting the inside of the molds gold, so I opted for yellow instead.  
1 coat spray primer, 2 coats glossy yellow, 2 coats flat white
I used my glue gun to make sure these molds stay put on the canvases.

I need a manicure...bad!
 And here's the finished product.  All the supplies and molds cost me about $19.00.  Not bad, eh?


I placed them all in my Master Suite.  Fun abstract art to lighten up the mood.


In a couple weeks, I'll show you how I transformed this boring, cramped family room into something fabulous and grande!  I'm so excited!  This area is currently under construction as we speak, but I can't even show you that or I'll give too much away!  So... stay tuned!!!


~*Abigail*~

Sunday, February 5, 2012

Mr. and Mrs. Smitten, Your Suite is Ready... Master Bedroom Reveal

There were a handful of delays before I was able to get to this point...  Aaaah yes, the reveal of my home getaway-within-the-home is finally here.  If you need a reminder of how this room used to look, check out my past post, A Terrifying Tale of Blue Bathroom Counter tops and a Neglected Master Bedroom.  It was pretty mundane and was crammed full of safety hazards.  We can't afford to take too many vacations, so I was stuck here.  Depressing, no?  Well, I don't do depressed.  It just isn't in me to wallow in my sorrows and pity myself.  I decided to bring the hotel vibe into my bedroom - and yes, it turned out just as fabulous as I imagined it would be.

Before I let you in, let's recap on my goals for this room:

1)  Paint some walls - Check!
2)  Replace the eye illusion bathroom counter tops and give the heave ho to the sinks and faucets - Future Project, not a Fail
3)  Tear out the safety hazard carpet and install some new flooring - Check!
4)  Add some eye candy to my bedroom walls and extra wow factor to everything else - Check!
5)  Dump the overweight (used to be cool) TV in another room.  Maybe a future guest room? - Checkity Check!

Come on in for some R & R...

Go ahead, it's okay to gasp.  I do every time I open my bedroom door.  Oh how I love it so!!  I am so *smitten* with how well this turned out, I'm wondering if I should pinch myself to check if I'm dreaming!

Sorry, I cannot do without the ceiling fan.  I have a west facing bedroom.  Summers are brutal for us!

 I've divided my project into three areas.  #1 is my Bed Area.  No, I didn't change the actual bed.  I did change (about three times) the bedding, added some fab eye candy on my nightstands, whipped up some abstract art work above the headboard and added a touch of hotel glam with the curtains.

Bedding: Ikea $40, HomeGoods $40 and Ross $12, Curtains: Ross $8
 My nightstand vignette.
Lamp: HomeGoods $29 ea, Clock: HomeGoods: $10, Horse: Spray painted it after I brought it home from the DI for 50 cents.  Notebooks: Target (because they were gray and yellow)
 Mr. Smitten's more masculine nightstand vignette.
He wouldn't let me get rid of the old clock.  He calls it dependable, I call it retro.
 I couldn't not let you in on a little night time ambiance. The combination of the lighting and the curtains is fantastic at night.  Even I wasn't planning on this at all.  What a wonderful surprise!

This picture doesn't do the room quite enough justice.
 I wanted to add some art to my walls, but didn't want to spend a fortune.  I took a trip to Walmart and picked up some canvases in their "art" section, played around with some paint samples I had purchased previous to the bedroom makeover idea and came up with these:

Canvases: Walmart $7 for pack of 2

I liked that I applied different colors and textures and was very satisfied with my $14.00 and 2 hour investment.

I told you I was doing something with that branch!
 Next area is the side of the room that holds my dresser.  I mentioned that I was bored bored bored (I am always bored)!  I wasn't planning on painting it, but received some great advice to paint only the trim and knobs.  (Thanks, Winnie!)  It now has a fresh look and I didn't break the bank doing it.  I only used about a quarter of a Valspar paint sample which is only $3.00 each!

Glamorous with a touch of Contemporary
 I picked apart some pieces from around the house and added it to the top of my dresser.  I now have a big void where this painting used to hang.  I guess I have to go shopping for the living room again... darn.

Purchased these from Kohls, HomeGoods, DownEast, the DI and Scentsy
 It's time for Area #3.  This is my favorite part of the room.  I heart this space so much!  This area is the vanity/sitting area.  This took weeks to complete - finding the perfect touches within the budget and wishing and hoping the one vanity that I would fall head over heels for would magically turn up out of the blue was driving me crazy.  If I want to beautify myself, I want the space to be beautiful as well.  After more patience than I'd like to give, everything fell into place (this morning).

I am loving this beveled mirror desk!  The ENTIRE desk is covered with beveled mirrors!!  
 My vanity vignette with plenty of space and function for my daily morning makeup routine.

My favorite jewelry present from the hubby sits within arms reach.  I love my pearls!
 I am still flabbergasted with all my finds from our local DI.  I found this wooden couple sculpture for $1.00.  All I had to do was add a coat of paint a voila!  Sleek perfection and awesomely appropriate for this room.  The liquor goblet was $2.00 and all I did to dress it up was add one of my favorite to wear necklaces.  This has two purposes - to make this goblet look extra faboosh and also so it's an easy daily reach for my office outfits (can't go wrong with a simple, yet stylish white gold necklace).


Since my desk doesn't boast with much storage, I opted for a simple box/basket from Ikea for all my hairstyling tools.  I am also loving this Tobias chair also from Ikea.

I heart my MK purse.  Its color tied in perfectly with my current color scheme.
 So there you have it.  You can get away from the rest of your home and pretend you're on a little vacay with touches of hotel chic in your own bedroom!  Let me know how it turns out for you!

I'll have to let you go now.  This girl is in much need of some makeup and hair makeover at her stunning new vanity!

Zero makeup!!  AAaaaagghhh!
 Sorry, I have to do it again...

*Gasp*

  
Keep your eyes out for my next mystery project:

Jello Molds = Glam?  You'll definitely have to see it to believe it!
jello-molds1

~*Abigail*~


Linking up to Savvy Southern Style